
The non-destructive workflow
The layer-based non-destructive workflow is seen to be the goal of the skilled Photoshop operator. In truth, it is sometimes difficult to achieve for every image, but a lot of the time a non-destructive workflow is possible, and powerful. I would like to explain it in very broad terms here.
I’ll begin by saying I don’t like the term "non-destructive workflow". To speak of "destruction" makes it sound like something catastrophic is going to happen to our image! Of course that’s not so. And I simply think that it is not an apt description for the intent of the workflow, which is to allow us to infinitely re-edit our image as we see fit. The power to change our minds about any of our previous adjustments, without having to start all over.
I would prefer the tag "reversible workflow" or "flexible editing" or something like that. However, for the sake of simplicity, I’ll persevere with the title of "non-destructive editing" for this post.
So, let’s take a look at a layer-based edit:
(I’ve saved this as an animated gif so you can see each adjustment consecutively. It’s dotty, but I hope it’s clear enough.)
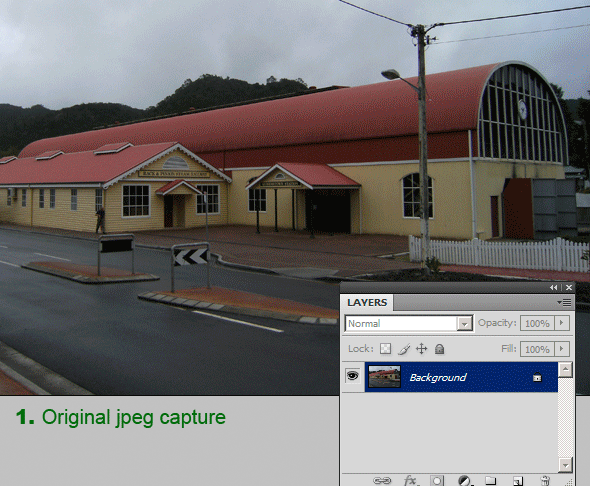
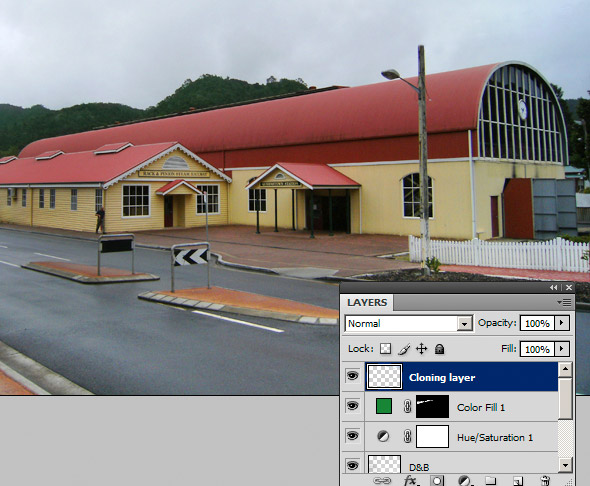
I’ve begun with a simple jpeg capture, and made several adjustments to it, each on its own layer, and completely "non-destructive" – that is, completely re-adjustable. With the layers saved in this file, I can return to any of my adjustments and tweak it further.
For example, I could go back to the Hue/Saturation layer and reduce the saturation slightly, if I thought I’d overcooked it. Or I could return to the first Curves layer to uniformly brighten the whole image a little more. Or I could do some more dodge & burn on the Overlay layer. Like I said – the power to change my mind.
Ok, so that’s non-destructive editing in a (very small) nutshell. As long as you don’t flatten or merge your layers, you maintain powerful and flexible control over your image. (And by the way, those adjustment layers add very little to your file size, so don’t be concerned about your hard drive space!)
Where people run into trouble is when they begin to add pixel layers into the mix. Let’s take a look at an example:
I’ve made a new blank layer at the top of the stack, and using the cloning and healing tools, I’ve erased the power lines, and shortened the pole a little. Looks fine, right? Well, not really.
Here, I’ve returned to my original Curves layer and attempted to brighten the whole photo a little further. Look what happens to my cloned area on the sky:

The cloned pixels, being at the top of the stack, don’t get the effect of the adjustment. (Remember, all adjustment layers only affect the pixels below them.) My cloned pixels are still as dark as before, and now they stand out like dogs’ ba … I mean, they stand out prominently.
So, the moment you add any image pixels above your adjustment layers, those adjustment layers cease to be flexible and re-editable. They’re just so much dead wood sitting there, no good to anybody.
Therefore, any pixel edits (such as cloning/healing, noise reduction, etc) should be done at the bottom of the stack, just above the original image. This way, any pixels you add get the same adjustments as the original pixels, and continue to do so into the future:

I’m a realist – I know that this "perfect" layer-based workflow is sometimes just too difficult to maintain. If you’re in a hurry, or you know that further editing won’t be required to this image, then you just stack layers on top of each other as you see fit, and get the job done. But if flexibility and safety is your goal, then this stuff is fabulous.
I need to discuss one more matter. I was prompted to write this article after reading the absurd suggestion that it was necessary to begin by duplicating the Background layer for "safety" in the non-destructive workflow. Nothing could be further from the truth.
Duplicating the Background layer immediately doubles the number of pixels being stored in your image file, and therefore increases the file size proportionally. Habitually duplicating the image effectively changes your 500GB hard drive to a 250GB hard drive, because you’re using twice as much space for each file. So is it really necessary?
In this example, I’ve begun by making a "Background copy" layer, then proceeded to make my non-destructive adjustments in the usual way.
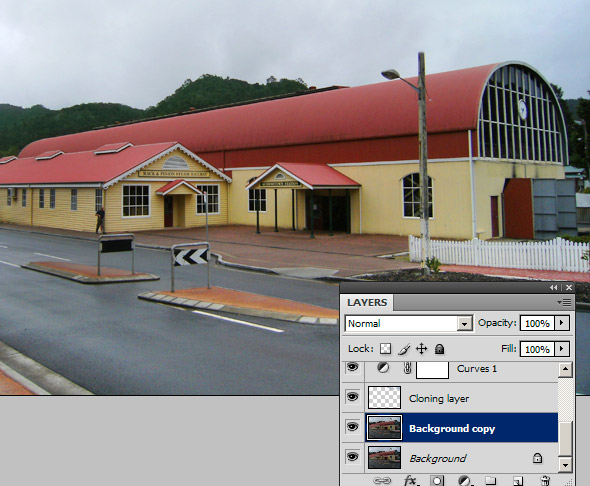
There is zero purpose for this copied layer. If my adjustment layers don’t turn out well, and I decide I need to start the whole thing over, do I need that copied layer? Of course not. I just delete the adjustment layers, and begin again from the Background layer.
If you are in the habit of using then merging your adjustment layers, then yes, a Background copy is definitely necessary. But merging layers does not form part of a non-destructive workflow. If you are getting confused by all your layers, just group them to tidy up your Layers panel a bit (sorry Elements users, I don’t think you can group yours.)
So when is it ok to duplicate the Background layer? Well, the most common reason is if you need to remove something using the Patch Tool. That tool can't work on a blank layer.
More comprehensive information about these matters can be found in this article.