
Cropping in the workflow
We all know what cropping does. It removes part of a photo. If we had a physical photographic print in our hands, we’d crop it by cutting it with scissors or a scalpel, and throwing part of it away. In digital terms, we remove some excess pixels from one or more sides of the file.
In all programs, the Crop Tool looks something like this …

… and it works like this:
It’s a simple concept that’s as old as photography itself, and it’s really important. But despite being so simple, there are lots of ways to get cropping wrong, and lots of frustration if you do. So I need to discuss when and how cropping should take place in your imaging workflow.
Let me make this very plain: DON’T CROP DURING EDITING.
Seriously. Don’t crop your raw file, and don’t crop in Photoshop while creating your masterpiece. Edit the whole photo.
I know what you’re thinking …
- "But I need to crop away some dead space!" No.
- "I have to crop to the Rule of Thirds!" No.
- "Shouldn’t I remove that …" No.
- "What about …" No.
- "But …" NO.
Keep every pixel while you’re editing.
You do NOT know when you’re going to need those pixels. It costs you nothing to keep them, and it might cost you a heck of a lot of time if you don’t.
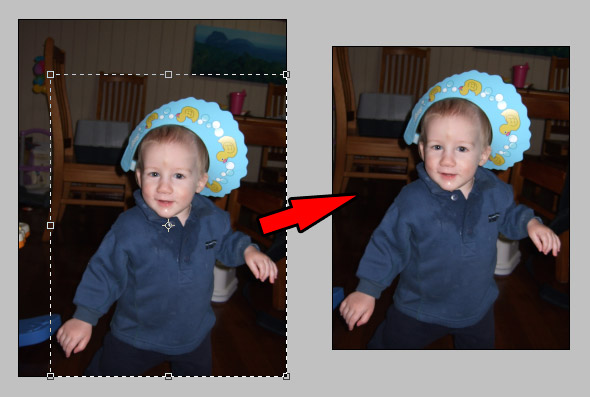
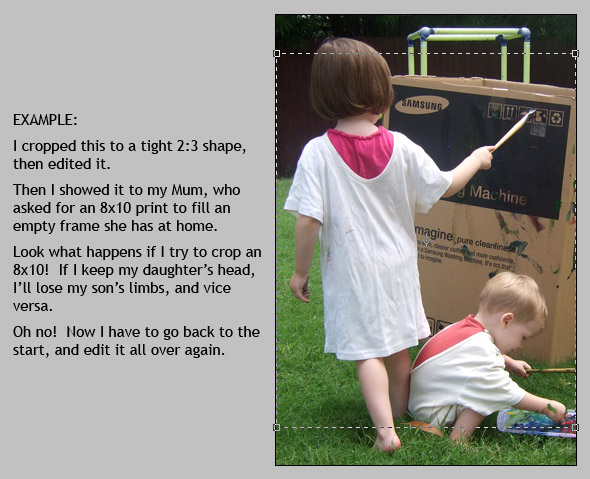
The most common problem caused by early cropping relates to print sizes. If you crop to one particular shape, then your client (or your Mum, or whoever) orders a print of a different shape, you can find yourself in trouble.
You’ll also find yourself in trouble if you’ve cropped tight, then your client orders a gallery-wrapped canvas. The tedium of trying to create extra detail around the edges of your photo to give you enough space for the wrap will drive you up the wall. With every mind-numbing stroke of the Clone Tool, you’ll be thinking "Why didn’t I just keep the pixels that were there in the first place??"
These problems occur equally whether you crop to a specific shape, or freeform crop. Either way, you’re cropping without purpose, and I promise it will bite you before too long.
While I’m on this subject, I must also stress the importance of "shooting loose" in camera. Not really loose, but you should definitely allow 5-10% extra space around your ideal composition, just to be safe. Modern cameras have SO many millions of pixels that you can easily spare a few around the edges for peace of mind. The "Fill your frame" mantra is long-established, but it’s unnecessarily dangerous, and I urge you to take a small step backwards.
I’m sure my message here is striking a chord with experienced photographers. Most have made the mistake at least once. In a recent discussion in our Facebook group, several people recounted their own experiences:
"I learned that lesson the hard way on my very first not-my-own-children session! My cousin’s engagement photos – first she was going to make 16×20 and then she was going to get them printed square and then she changed back to some kind of rectangle. And every time I had to re-edit!"
- Jill, Texas.
"I cropped a family photo and it looked fantastic. Until they wanted it on a canvas. It had been a lengthy edit so instead I spent ages ‘creating’ extra image at the edges. And it looked crappy so I ended up paying $60 for a wasted print and redoing it."
- Kim, New Zealand.
"I have certainly learned that the advice 'Fill your Frame' is NOT the best way usually! SO many people tell you to fill the frame with your subject, but that can cost you later. Gallery wraps can’t be made from a filled frame shot… or not easily anyway."
- Sandy, Alabama.
"I learned this the hard way on my very first client session – NEVER again!"
- Cyndi, Kentucky.
I urge you, learn from the mistakes of others, not your own. If cropping is a habitual step in your editing workflow, remove it now. Keep all of your pixels.
So, am I suggesting that you should never use the Crop Tool? Am I suggesting that you should display and print every pixel you capture?
Of course not. Cropping is composition, and composition is an integral part of photography. Your clients should only ever see photos that you’ve cropped perfectly.
But cropping must be part of the output process, not the editing process. Once you’ve edited and saved your whole image, that is your Master File, from which all cropped versions will be created.
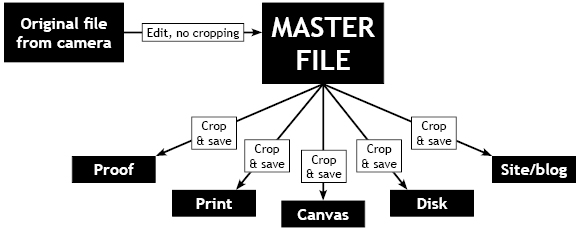
For each output purpose, you open the Master File, and crop it. Then you perform any other output steps that might be necessary (eg resizing, sharpening, watermarking, vignetting, or profile conversion), then save as a separate file. Be extremely careful not to save over the Master File.
Needless to say, each of the output purposes in the above diagram require their own cropping method. Proofs are cropped to the 11:15 shape, and resized suitably for your proof site. Prints are cropped to the exact ordered size. Canvases are also cropped to the ordered size, with extra room for the wrap, of course. Images sold on disk are cropped to 11:15 without resizing, and images for your web portfolio can be cropped however you please.
Almost 100% of the time, the output files will be Jpegs. The Master File can be a PSD, a Tiff, or a Jpeg, depending on your needs. You can read more about the Master File workflow here.