
Preventing banding in backdrops
Lots of you love to shoot against plain seamless backdrops, but so many of you have been bitten by banding when you’ve printed those photos. (Of course, it’s not just seamless – any plain background can do it, and so can skies.) In this thread, I want to discuss the best three strategies for avoiding this problem.
I hasten to say at the outset that I think it’s impossible to fully safeguard yourself against banding, forever. Any bad lab, or even any good lab on a bad day, can get banding in prints now and then. But let’s talk about safeguarding as well as we can.
If you’re reading this wondering what banding is, consider yourself lucky to never have seen it. Essentially it’s stripiness that appears in areas of smooth (but not quite even) colour. I created an exaggerated example to show you:

Ok, let’s talk about the three solutions …
SOLUTION 1: Don’t use that backdrop!
Seriously. Avoid smooth backdrops or backgrounds of any kind. A problem can’t occur where it can’t exist. Heck, even only shoot skies on cloudy days
SOLUTION 2: Don’t edit it in Photoshop in any way.
A SOOR backdrop shouldn’t band. We only get into trouble when we manipulate it further in Photoshop – either a little, or a lot.
But of course, often we do need to edit it in Photoshop …
SOLUTION 3: Replace it altogether.
I know this sounds drastic, but trust me, it’s the safest way. If your backdrop/background needs changing, don’t try to partially modify it. That’s where trouble starts. Replace it completely. And that’s what I want to discuss here.
In the past I have written quite a few articles about replacing backgrounds, in one way or another. Often I mention the importance of adding noise. Noise is a key factor in banding minimisation. By adding noise, we slightly break up the continuity of the tones, preventing those "stripes" that I showed you above.
But I know a lot of people say that they get banding even through the noise. This generally happens if they’ve tried to partially modify a background. Noise is not so effective in that case. That’s why I’m here to discuss complete replacement.
Complete replacement involves the use of Gradient layers (usually both "linear" and "radial"). And when you use them, you MUST have the "Dither" checkbox turned on:
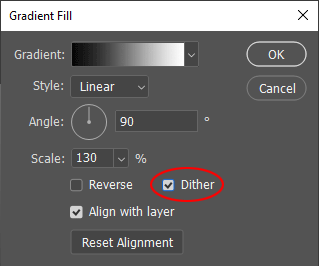
Dither is like in-built noise. Try it yourself and see – when adding a Gradient layer, zoom way in to like 800% or so, and turn the Dither checkbox on and off. You’ll have to look closely, but you’ll see it.
So, use gradients, and use Dither. Don’t use any masking on the background area if you can at all avoid it (since dither isn’t applied to masks). Mask around your subject, of course, but that’s all.
This is all probably sounding completely vague, so following are a couple of PSD files that you can download and see what I mean. My huge thanks to Jessica and Emily for their permission to use their photos.
In both cases, you’ll see I applied an initial gradient layer, and that was the one I masked around the subject. Then subsequent gradient layers were clipped to the first one, so that no extra masking was necessary. And at the top, noise layer.
(By the way, my masking is a bit imprecise. So sue me, it’s a tutorial.)
Example 1
This one began with a horizontal linear gradient, then a couple of radial ones, to try to mimic the tones of the background Jessica wanted. Remember that the more similar the tones are to the original, the easier the masking will be, and that’s SO important.
When you examine the layers, notice that the Dither box is checked each time. Also notice the varied size of the radial ones, as needed.
Example 2
This one, per Emily’s desire in her original thread, began with a vertical linear gradient, then a small radial one to mimic one lighter area of the original background. Then another larger radial one to kind of mimic the shadow of the child. I realise it’s not particularly accurate in this regard, but it’s easily good enough, and it’s SAFE. It won’t band.
Example 3
When I posted the original version of this tutorial, a couple of people asked about vignettes, which I’d overlooked. Yes, of course the same banding problems can occur with vignettes, so here’s another file:
Personally I think this kind of vignette looks really awful, but I’m here to help everyone, not just people with good taste :)
You’ll see it’s just one radial gradient layer, with the opacities and slider positions modified so that it only affects the outer part of the image. (I encourage you to learn about this the way children learn – by playing.)
There’s one small problem with this method – you can’t easily clip the noise layer to the affected areas only. So you’ll see I’ve had to manually mask the noise layer. Not too much precision is required, though.
Note about 16-bit:
It’s often said that working in 16-bit will prevent banding. (This statement always puts a sad face on Elements peeps, who can’t work in 16-bit).
Well, this is true to a degree, but it ain’t all that. If you use the method I’ve demonstrated above (the gradients with dither) 8-bit is perfectly fine.
If you need to modify a background in PS, but can’t bear the thought of replacing it completely, then work in 16-bit to be as safe as you can. But still use Dither if you can, and still add noise if necessary.
Video!
Watch me do one: