
Article title
If you’d like to make your own storyboard or collage, or if you’d simply like to place your photos in a template that somebody else made for you, you need to know about clipping masks. Clipping masks are the way to fit a photo to a specific shape in a layout.
This is a very simple tutorial for beginners. I’ve created it in Photoshop CS2, but it will work just the same in all versions of Photoshop and Elements.
Here’s the basic little design I’m going to make:
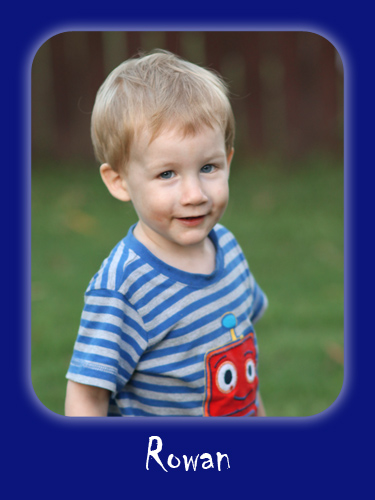
Ok, ok, I know it’s simplistic and cheesy. My creativity is pretty dismal. But that doesn’t matter. I’m going to show you how to make this design, and in the process I hope to give you the skills and confidence to create your own … much grander than this 🙂
STEP 1: Plan plan plan!
Storyboards and collages are a heck of a lot easier if you have a firm concept in your head before you begin. Sketch it on a piece of paper if it helps (that’s what I do).
It’s possible to change the shape and size of a design after you’ve made it, but it’s not easy. Much easier to get it right from the start. So don’t be hasty – put a bit of thought into it.
In this example, I just want to make something that will look nice on social media. I want it to be a portrait orientation, and I guess 3:4 shape will be nice. So I go to File>New and make a new blank image at 540x720px:
In order to lay things out with nice even spacing, it’s a very good idea to use grids. You can find out a bit more about them in this grids tutorial.
For this layout, I’ve chosen a 30 pixel grid (subdivided in two). You can see the grid over the white document on the left side:
Ok, that’s the preparatory work out of the way.
STEP 2: The background
First, my design needs a background colour. So I go to the adjustment layer icon in my Layers Panel, and choose Solid Color:
There, I choose a nice blue:

STEP 3: The shape for the photo
This is the most important bit. I have to create a shape which will be the "clipping mask" for the photo, when I insert it later.
I press U to get the shape tool, then click and hold on it and choose the Rounded Rectangle Tool:
As you can see, there are plenty of other shape options in there too. Hours of fun 🙂
Then I look up to my Options Bar. If yours has the same options as mine, make sure you have the same ones selected (circled) as I do. In the Radius field, I choose how rounded I want the corners to be – in this case, 60 pixels:

Then, I draw my shape. Using the grid, it is 45 pixels in from each edge, but a bit more at the bottom to allow for some text. You can see how it’s dead easy to get a perfectly aligned position by using the grid. If I didn’t have the grid, I’d be guessing – badly!
(By the way, there might be a bit of trial and error for the radius of the corners. You might need to draw/delete/adjust/draw a couple of times until it looks right.)
At this point, I don’t need the grid any more, so I press Ctrl ' to turn it off. Now I can see my file more clearly:
Something I must mention at this point – it doesn’t matter what colour the shape is. Black, white, red, whatever. It’ll end up hidden anyway.
STEP 4: Text
Now I choose my text tool, and add Rowan’s name at the bottom of the design. I play around and find a font that I like, and adjust the size until it looks nice. You can see that I now have four layers – the "Background" layer (which has nothing on it), the blue layer, the shape layer, and the text layer:
STEP 5: Inserting the photo
Now the fun begins. Select the shape layer …
… then go to File>Place, and choose your photo from wherever you’ve saved it:
(If your version of Photoshop has a choice of "Place Linked" or "Place Embedded", choose "Embedded".)
The photo places itself immediately above the shape layer. When it appears, it has its "handles" active, ready for you to resize it as needed. However, there’s not much point in doing that until we’ve clipped it to its shape layer, so I just press Enter right away to get rid of the handles:
STEP 6: Clipping
This is the key to the whole thing. You have to "clip" the photo to the shape layer beneath it. When you do that, the photo will only be visible where it’s lined up with the shape.
This is the only place in this tutorial where I have to explain a different method for Photoshop and Elements. If you’re using Photoshop, you press Ctrl Alt G. If you’re using Elements, it’s just Ctrl G. (Substitute Cmd and Opt on a Mac, of course).
When you do that, you’ll see a little downwards arrow in the layers panel, indicating the relationship between the layers:
At this point, you may or may not notice anything different. I certainly didn’t on this one – everything looks the same, right? Well, hold on to your hat …
STEP 7: Resizing
Still with the photo layer selected, press Ctrl T to re-activate the transform handles. Now you can resize the photo as desired. When I enlarge the photo beyond the limits of the clipping shape, you can see what happens. The photo is much larger than the shape, but it’s only visible in the shape area:
Once I finished transforming, I just press Enter to finish. Done!
(In older versions of Photoshop, it was usually necessary to hold down the Shift key while resizing to prevent the photo from distorting out of shape. Then with the introduction of Photoshop CC, suddenly the default setting switched around, and the Shift key made photos distort out of shape! This change confused all of us at the time. So if you have CC, you shouldn't have to use the Shift key.)
When you do that, you’ll see a little downwards arrow in the layers panel, indicating the relationship between the layers:
That’s it! We’ve made a basic one-image layout. Now, let’s discuss some simple embellishments and modifications …
STEP 8: Layer effects
Let’s say I want to add a bit of a glow around the photo. Or maybe a border, or a drop shadow. It’s all very easy to do via the Layer Effects.
However, you have to remember that these effects are added to the shape, not the image. So, I select my shape layer, then click on the little Layer Effects icon in the Layers Panel:
In this case, I’ve chosen "Outer Glow" to give that soft white outline around the photo:
There are all sorts of wonderful things you can do in that Layer Effects menu. Have fun!
STEP 9: Modifying
What about if I decide blue isn’t working as the background colour? No problem, just double-click on the blue layer in the Layers Panel, and pick something different. Green to match the grass, perhaps?
Maybe I want the photo a little shorter to allow more room for the text? No problem, just select the shape layer, and press Ctrl T to transform it a bit:
(A word of caution – if you resize a rounded-corner shape like this, the corners will no longer be symmetrical. Be careful.)
And if I decide to make Rowan a bit larger in frame? Just select the image layer, and good old Ctrl T to transform him again:
STEP 10: Save as PSD
Don’t forget to save your file as a PSD (or Tiff), so that the layers are preserved. That way, you can modify it a bit more tomorrow, or even use it as a template to make lots of other designs!
Obviously you’ll need to save a Jpeg version to upload to the web, or the lab, or wherever, but always keep the PSD.
Well, that’s all for this tutorial. I hope it made sense. Once you do this a couple of times, it’ll be as natural and intuitive as breathing, I promise.
Now you can move on to the second tutorial, about multi-image designs.