Order of layers for complex pixel edits
I’ve written a great deal in the past about non-destructive editing, and its importance for a sensible Photoshop workflow. In essence, all adjustment layers go on top, and pixel layers at the bottom. This is because pixel layers block out any layers beneath them, rendering them un-re-editable (ok, not a real word, I know!)
Mostly, when I’ve discussed pixel layers in this context, I’ve concentrated on cloning. But pixel edits can take many forms:
- cloning/healing
- straightening
- noise removal
- head swaps or other photo merges
- liquifying
- perspective correction
- skin smoothing
Let’s get one out of the way right now. Noise reduction must be done in your raw program. If you’ve left it to Photoshop, you’ve left it too late. Go back and fix it.
Perspective correction can sometimes be done in raw. Do it there if you can, but don’t worry if you can’t, because you can do it with wonderful precision in Photoshop. Straightening can be done in raw, but I don’t recommend it, because it automatically crops some pixels away, and you might need those later.
The critical thing you need to understand about pixel editing is that each layer hides the previous one, thereby preventing it from being readjusted later. So it’s vital that each step is perfect before moving to the next one. Let’s examine a hypothetical nightmare photo that needs all five types of pixel editing.
Step 1:
Edit the raw file and open it into Photoshop (when I say "Photoshop", I’m referring to Elements as well, of course).
Step 2:
Do the Perspective Correction and/or Straightening (per the links above).
MAKE SURE YOU ARE 100% SATISFIED WITH THE PERSPECTIVE/ANGLE CORRECTION BEFORE MOVING TO THE NEXT STEP. You can’t go back later, so it has to be right.
Step 3:
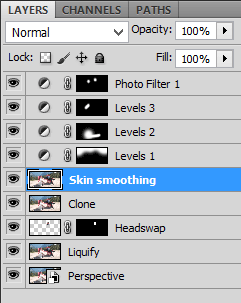
Duplicate the previous layer, name it "Liquify", and rasterize it (Layer>Simplify Layer in Elements, or Layer>Rasterize>Smart Object in Photoshop). Then do your liquifying.
MAKE SURE YOU ARE 100% SATISFIED WITH THE LIQUIFYING BEFORE MOVING TO THE NEXT STEP.
Step 4:
Headswap time, or sky swap, or eye swap, or whatever photo merging you’re doing. Make sure your masking etc is dead right, because there’s no going back.
MAKE SURE YOU ARE 100% SATISFIED WITH THE SWAP BEFORE MOVING TO THE NEXT STEP.
Note: After this point, you can start adding adjustment layers on top if you wish. But it’s probably better to do all the pixel editing first if you can.
Step 5:
Now it’s time for cloning and healing. Add a new blank layer immediately above the photo merge layer from Step 4, and press Ctrl Alt Shift E (Cmd Opt Shift E on a Mac) to "Stamp Visible" – ie create a new merged layer from all the layers below. Name the layer "Cloning", then do your cloning and healing on it.
Note: If you don’t intend to use the Patch Tool, you might simply be able to do your cloning and spot healing on a blank layer, without Stamp Visible. It does keep the file size a little smaller.
If you are doing any tricky cloning that requires masking, add another blank layer above the "Cloning" layer, do the cloning and masking, and once you’re completely satisfied with it, Ctrl E to merge it down into the main "Cloning" layer. Best not to keep multiple cloning layers, I find. Of course, don’t merge until it’s utterly perfect.
If you did perspective correction or horizon straightening in the first step, you might have space in the corners or on the sides of the image that you’d be cloning into at this stage as well.
MAKE SURE YOU ARE 100% SATISFIED WITH THE CLONING BEFORE MOVING TO THE NEXT STEP.
Step 6:
Finally, it’s skin smoothing time. Add another blank layer above the Cloning layer, and Ctrl Alt Shift E again to stamp. Name this layer "Skin Smoothing". Go ahead and do your skin work, however you prefer to do it (Portraiture, actions, etc).
Summary
Now you have all these layers:

Troubleshooting
If you realise you’ve cocked up one of the layers, you need to delete all the pixel layers above that layer, fix the mistake, then completely re-do all the others.
For example, if you notice that you left a subject with three ears in the headswap, you need to delete the smoothing and cloning layers, fix the masking on the headswap layer, then repeat Steps 5 and 6 from above.
If you notice you left the perspective a bit crooked, then you’ll be really mad at yourself!
Confused?
You betcha. You’ll remain confused even after doing this twenty or thirty times. It’s darn tricky. Needless to say, please post a question in the forum whenever you’re having trouble with a complex edit.
