Moiré
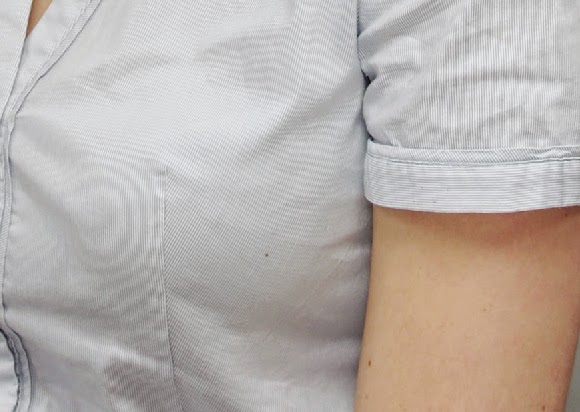
Have you ever opened a photo and been startled to see weird patterns in striped clothing, like this?

Or even worse, this?

This is called "moiré". It’s the digital version of the mesmerising patterns you see occasionally in real life – such as when two sections of fly screens overlap, or when one picket fence is glimpsed through another picket fence. In real life it’s pretty … in your photos, it’s a hassle.
If you are a portrait photographer, make sure you have a stern "No thin-striped clothing" clause in your "What to wear" guide. That will help you avoid this problem. However, it inevitably occurs to everybody from time to time.
There are three stages in the photographic workflow where moiré can occur – in the raw file, during resizing, or during sharpening. You have to be wary of all three stages. It could pop up to bite you on the bum at any time.
Let’s examine each stage.
Stage 1: The raw file
There is often good news at this stage. When you first open a photo, and notice those weird patterns, it’s most likely not really in the photo. 90+% of the time, it’s just caused by your screen, because you’re viewing at a smaller size. So if you see moiré in your raw file, the first thing you must do is zoom in to 100%:

This is the blue shirt from the photo above, viewed at 100%. See? There’s not really any moiré at all. Phew! If this is the case for you, wipe your brow in relief, and commence editing. But remember, you’re not out of the woods – the moiré could arise again in one of the later stages.

But sometimes, you’ll view at 100% and groan. Yes, the moiré really is there:

But is it really there? Make sure you have done your noise removal properly, and make sure there is absolutely no sharpening applied to your raw file. This is vitally important. Even if you usually apply sharpening to your raw files, you must remove it when moiré exists.
Sometimes the moiré will be a single colour, like the above example. Sometimes it will be a whole rainbow of colours. Either way, it’s bad news. If it’s still in your raw photo even after you’ve removed all noise and sharpening, immediately post a 100% crop in Ask Damien, and I’ll help you fix it. (Do your full raw processing first first, but no PS editing). Once I’ve helped you fix it, continue on with your editing. But be wary of the next stages.
Stage 2: Resizing for output
Once you’ve finished your editing, and have safely saved your master file, you’re ready to flatten and resize for output (either print or web). If you’re enlarging it for a big print, you’ll be safe. But any kind of reduction (for small print, or web) involves risk.
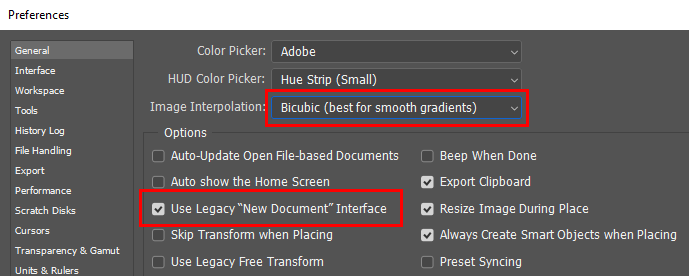
Before you start your output workflow, there's a really important setting you must check. Go to Preferences>General, and make sure the Interpolation setting is "Bicubic (best for smooth gradients)":

It's so important to resize to the exact size and resolution of the output destination you're preparing for. "Near enough" is never good enough. Visit me at Ask Damien if you need help with this.
After you’ve flattened and resized, immediately check at 100% again:

If you see no moiré at 100%, great! Go ahead and sharpen for output (next stage).
But if you do see moiré, curse loudly. Then explain to your nearby children that you were very upset, and they must never repeat those words they just heard you say. Curse again, but under your breath this time.
If possible, choose a larger size. Moiré that’s visible in a 6×4″ print file might be avoided in a 5×7″ one, for example. Try it and see. Heck, it might be worth offering your client a free print size upgrade, just to avoid the problem.
But often we’re locked in to our output size, so we have to manage the situation as best we can. The following is the best method I’ve found:
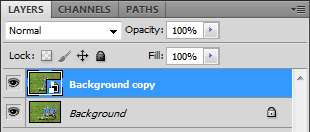
First, I return to my master file, flatten it, then duplicate the Background layer, and go to Layer>Smart Objects>Convert to Smart Object. Turning it into a smart object provides a small degree of protection, I’ve found:

(Elements users, you don’t have this convenient method. You have to flatten your master file, then go to File>Place, and place the saved master file on itself. The Place function brings it in as a smart object. Then zoom in to 100% and turn the layer on and off, and if necessary nudge it around until it’s perfectly aligned with the Background layer.)
Then go ahead and crop or resize for output as before. The smart object layer will probably still display a certain amount of moiré, but hopefully not as much.
Here’s a comparison. This is the photo I showed you before, resized in the normal way:

Here’s the same photo, resized with the smart object layer on top. See how there’s less moiré?

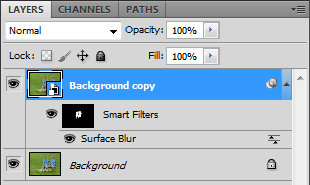
Then, go to the Filter menu and choose a blur. I’ve found Surface Blur can work sometimes, but other times maybe good old Gaussian Blur, or one of the others. See which is best for removing the last of the moiré from the area. This testing process might take some time, I’m afraid.
(Elements users, your software will ask you to rasterize the smart layer before blurring. This is ok.)
Then mask the blur so it’s only applied to the problem area (of course you don’t want the whole photo blurry!):

Let’s be frank – the above method is a pain in the proverbial, and doesn’t give ideal results. Who likes blurring their photo?? Not me. But it’s the best way I know to combat moiré, so occasionally you’ll have to do it. I just hope you don’t have to do it very often.
Stage 3: Sharpening for output
After you’ve sharpened for output (print or web), check again at 100% for moiré. If you see it, it’s easy to deal with – just mask the sharpening off that area.
